Installing the DMS server
When you have installed the following prerequisites:
- Microsoft .NET Core 8.0 Windows Server Hosting bundle
- Microsoft .NET Desktop Runtime 8.0
- MongoDB
- IIS (optional when testing/developing)
- Microsoft Visual C++ v14 redistributable (x64)
you can continue installing the DMS Server itself. Run the installer: DMS Server <version number>.exe
Follow the installation screens, nothing special needs to be setup until after the installation, when the administration console is started. The administration console will automatically start in wizard mode. You can also always start the wizard manually by clicking on the wizard button on the bottom left corner of the admin console:
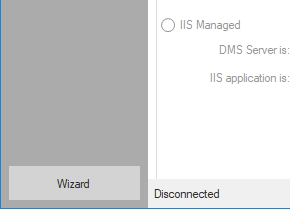
Start the wizard mode manually from the admin console click to enlarge
The wizard will guide you through the following topics of the installation of DMS Server.
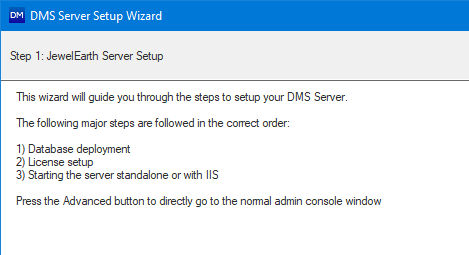
The wizard guides you through the installation click to enlarge
Database deployment
First select the correct MongoDB instance you want to use and select the MongoDB authentication type that should be used to deploy the database. The account that you use to deploy the database needs permission to create a new database and setup security for it. When the database is already setup to use SSL or force only use SSL you should check the SSL checkbox here to use it.
In the Database deployment section, fill in a host name and a database name which is by default DMS.
Click Deploy. The database should get deployed successfully now, a message box will pop up informing you. When it is done, click Next or Apply at the bottom of the DMS Server Setup Wizard form.
If you select an existing database here it will upgrade your database to the latest schema.
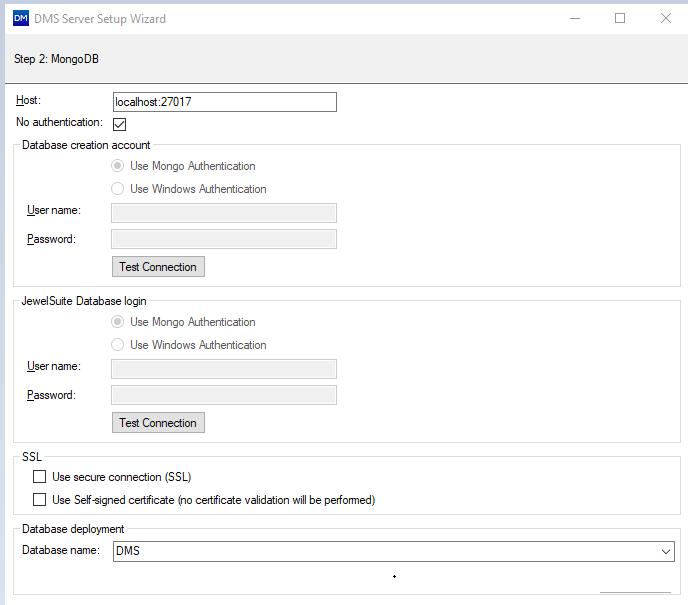
There are two types of users; one to create the database and one to log on to the database. click to enlarge
Deploying the database using scripting
Deployment of the database can also be performed with the dmsservermanager tool, which is supplied with the DMS server installer. The call would typically look like this:
Dmssermanager.exe deploydb
- Using MongoDB server name and database name:
Dmsservermanager.exe deploydb -s “localhost:27017” -d “DMS”
All parameters listed in the table below are optional (using scripting, there are more options then when you are using the DMS administration Console)
| Short Name | Long Name | Default Value | Required | Description |
|---|---|---|---|---|
| -s | --server | localhost:27017 | False | Mongo server name. |
| -d | --db | DMS | False | Mongo database name. |
| -m | --auth-method | None | False | Mongo authentication method. |
| -u | --username | <Blank> | False | Mongo database username. |
| -p | --password | <Blank> | False | Mongo database password. |
| -c | --disable-content | False | False | Disable collection creation for content chunks and content files. |
| -a | --admin | <Blank> | False | Default admin user. |
| -t | --tls | False | False | Enable ssl connection. |
| -e | --self-signed | False | False | Use self-signed certificate. No certificate validation will be performed. |
| -i | --ignore-dpapi | False | False | Ignore use of Windows DPAPI for encryption of the database password. |
Starting the server, standalone or via IIS
Next, you will setup the DMS server.

Setting up the DMS server. click to enlarge
Database configuration This section is taken from step 1, Database deployment. If the server name and repository database are filled in correctly, you do not have to select anything in this section.
Use secure connection (SSL) Here, you set up SSL. More information is explained in the chapter about security, see DMS security.
Service Account It is recommend using a service account for the DMS server and IIS unless you use the local machine setup.
Server Mode Here you install the DMS windows service and setup IIS. IIS setup is disabled when IIS is not installed.
For IIS install, make sure that the settings on this form are selected properly:
Prefix Here you can add a prefix to the URL so you can create dmsentry/name where 'name' is the prefix. This field can (and will almost always) be empty.
DNS FQDN fields In the three DNS fields you need to fill in the DNS entries that you requested for IIS, see Installing IIS > Prerequisites.
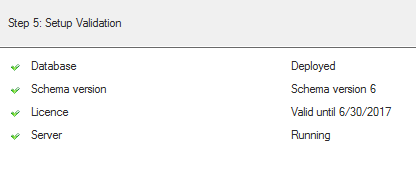
The wizard verifies if everything is running. click to enlarge
When all check marks are green, the DMS server is running fine and you can click Finish. The normal view of the administration console is opened. When all is successful, the project management page is enabled and working. Here you can create your initial top level project setup.
All these windows are also found inside the normal pages of the administration console, see the administration console.